


How to Blur a Photo: 12 AI Prompts for Background and Faces (2026)
Phone methods for blurring a photo (iPhone Depth Control, Samsung Gallery, Google Photos), 12 ready-made prompts for Gemini and ChatGPT, and a 14-photo measurement: light blur and an eye bar do not hide a face from a face recognition model.
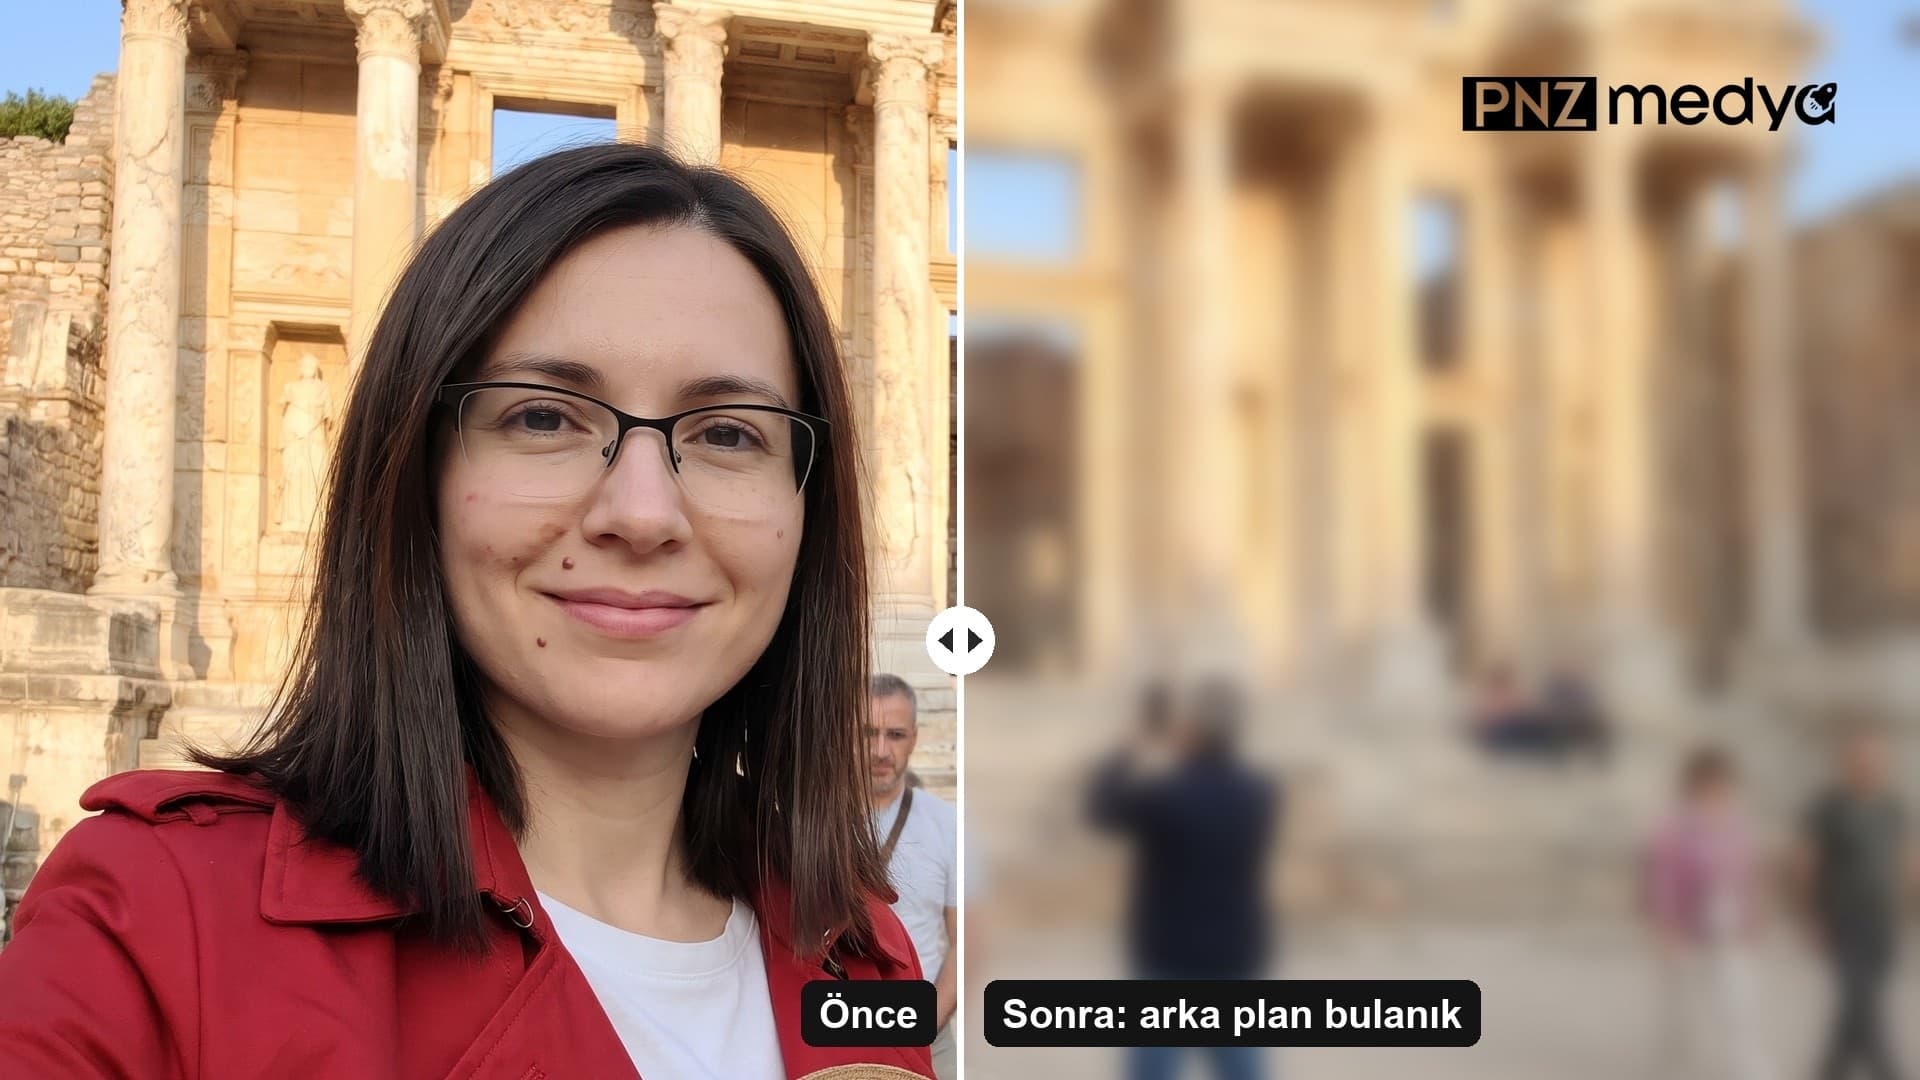
- Blurring the background of a photo taken in Portrait mode is one slider on your phone: on iPhone, Edit > Portrait > Depth Control. For a photo taken normally, Samsung Gallery's "Blur background" suggestion or a prompt typed into Gemini or ChatGPT does the job.
- Typing only "blur" into Gemini is too weak: in our earlier license plate test, that request left the text readable in 5 of 6 frames. The prompts below describe how much blur you want in terms of lens and distance.
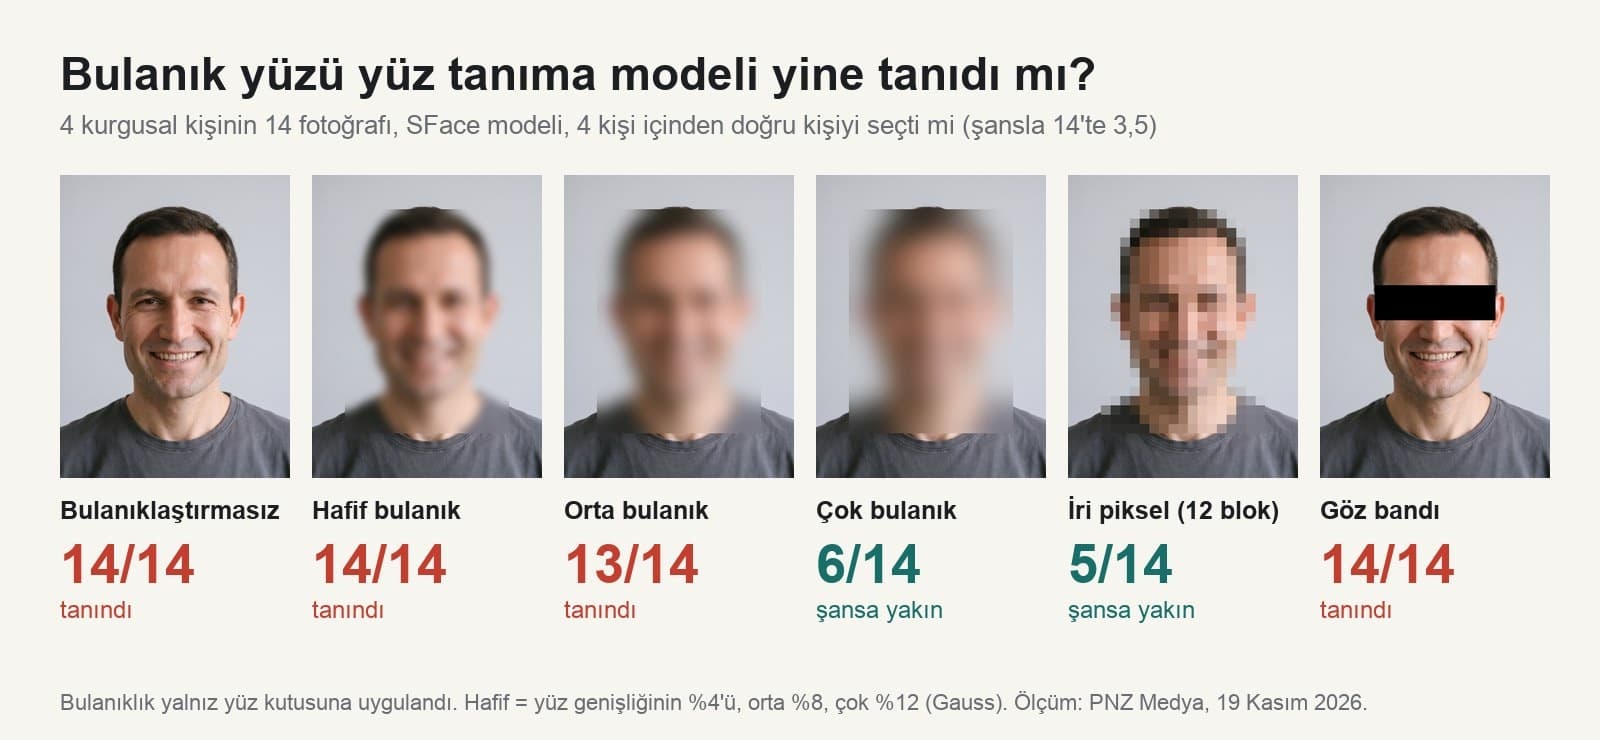
- In our face-hiding measurement, blur that looks unreadable to the human eye was not enough: a face recognition model matched 14 of 14 lightly blurred faces to the right person, and 14 of 14 faces with a black bar over the eyes.
- The settings that pushed the model down to chance level were blur equal to 12% of the face width, or 12 or fewer large pixels across the face (5-6 correct out of 14, chance is 3.5). The safest option is covering the face with a solid color.
- To hide a face or a license plate, use your phone's markup tools instead of Gemini: Google Photos' Redact tool and Clean Up on iPhone edit the photo on the phone, and you see and adjust the result yourself.
The fastest way to blur a photo depends on the photo you have. For the background of a photo taken in Portrait mode, you don't need to download an app: in the Photos app on iPhone, tap Edit, then Portrait, and drag the Depth Control slider. If the photo was taken in normal mode, or you want to choose the kind of blur yourself (round glowing night lights, motion trails, only the crowd in the back), the quickest route is uploading the photo to Gemini or ChatGPT and pasting one of the prompts below.
The second big reason to blur is privacy: making a face, a child or a license plate invisible before you share. We ran a measurement for this. We blurred the faces in 14 photos of four fictional people step by step and asked a face recognition model who they were; the results don't fit the idea that "a little blur is enough" at all. The post covers the phone methods first, then 12 ready-made prompts, then the details of this measurement.
We did not have Gemini or ChatGPT generate any new images for this post. We ran the face measurement on our own computer on November 19, 2026, with OpenCV's YuNet face detector and the SFace face recognition model. How Gemini responds to a "blur" request comes from our license plate and street sign tests on November 2 and 4, 2026. The phone steps come from the help pages of Apple, Samsung, Google and Microsoft, read the same day.
How to Blur a Photo: Which Method for Which Job
Short answer: adjusting the blur of a portrait photo works better on your phone, a special blur effect works better with AI, and hiding a face or text works better with your phone's markup tool. The table lists the first method to try for each job.
| What you want to do | Try first | Where | Watch out |
|---|---|---|---|
| Make the background of a Portrait mode photo more or less blurry | iPhone Depth Control | Photos > Edit > Portrait | Changing the focus point is available on iPhone 13 and later |
| Blur the background of a photo taken normally | Samsung Gallery suggestion, Google Photos Portrait blur, Windows Photos | Gallery > Details; Edit > Tools; Photos > Background | Whether the suggestion appears depends on the device and how large the person is in the frame |
| Turn night lights into round glows, add motion trails, a miniature effect | Gemini or ChatGPT + prompt | gemini.google.com, chatgpt.com | The model redraws the photo; zoom in and check the face |
| Make the faces of strangers in the background unrecognizable | Gemini prompt or Google Photos Redact | Edit > Markup > Redact | Light blur does not hide a face (measurement below) |
| Hide a face, license plate or document for certain | Solid-color, opaque box | Your phone's editing or markup tool | A "blur" request in Gemini left the text readable |
Sources: Apple iPhone User Guide on editing Portrait mode photos, Samsung Turkey support page on Galaxy AI edit suggestions for photos, Google Photos Help "Edit your photos", Microsoft Support "Edit photos and videos in Windows"; November 19, 2026.
How to Blur the Background on Your Phone: iPhone, Samsung, Google Photos
Adjusting portrait blur on iPhone
- In the Photos app, open a photo taken in Portrait mode and tap Edit.
- Select Portrait; drag the Depth Control slider at the bottom left or right to increase or decrease the blur. The gray dot shows the photo's original depth value.
- To move the focus to another person, tap that person in the photo. According to Apple, this is available on iPhone 13 and later.
- Tap Done. To remove the effect completely, tap Portrait at the top left and choose Portrait Off.
According to Apple's guide, on supported models you can also turn photos of people, cats and dogs taken in Photo mode into portraits afterwards: open the photo, tap the Portrait Off icon, then tap Portrait. The list of supported models is on a separate Apple page.
Samsung, Google Photos and Windows
Samsung's Turkish support page says the "Blur background" suggestion in Gallery appears only when two conditions are met together: the photo was not taken in Portrait mode, and the person or animal in the frame is above a certain size. You reach the suggestion by opening the photo and tapping the Details icon. In Google Photos, Portrait blur is among the editing tools; some tools vary by device and RAM, and some are Pixel only. The Photos app on Windows selects the background and blurs it with a slider, and according to Microsoft, the separation happens on the computer itself.
How to Blur a Background with AI: 5 Steps
Turning a normal photo into a portrait in Gemini or ChatGPT takes a few minutes. In Gemini, you can upload and edit photos with a Google account that has no paid plan; you need to be 18 or older to generate and edit images.
- Upload the photo at full size. Pick the original file instead of a screenshot or a compressed copy you got over WhatsApp.
- Name what should stay sharp: "the woman in the red jacket", "the coffee cup on the table". If you write "the person in the foreground", the model sometimes leaves someone in the back sharp too.
- Describe the strength of the blur in physical terms: "as if shot with an 85 mm f/1.8 lens", "the shapes of the buildings in the back should be recognizable, their windows should not".
- Ask for nothing new to be added: text, signs, people, light. In an earlier test, asking (in Turkish) for "the text to be blurry" brought in a new, readable sign in 4 of 4 frames.
- Zoom in on the result and check the face, the hair edges and the glasses frame; if something has shifted, use prompt 12 in the same chat.
In our November 2 license plate test, the original Turkish prompt asking Gemini to "blur the letters and numbers until they can't be read" left only a light blur in 5 of 6 frames across three Gemini models, and the plate was still readable. The model usually reads "blur" as a light effect. Say how blurry you want it with a lens or with a result sentence ("the facial features should not be recognizable at all").
12 Ready-Made Blur Prompts (Copy and Paste)
The prompts are written to work as they are in both Gemini and ChatGPT. Upload the photo, paste the prompt into the same message and fill in the square brackets for your photo. Prompts 1 to 10 are blur effects, 11 is for privacy, 12 is for fixes in the same chat.
1) Portrait mode effect: sharp person, blurred background
Make this photo look like it was taken in portrait mode: keep [the person who stays sharp, e.g. the woman in the red jacket] completely sharp, and softly blur everything behind them as if shot with an 85 mm f/1.8 lens.
Make the blur gradual: the ground near the person slightly blurred, the distant buildings and people heavily blurred.
Keep the hair strands, [glasses frame] and shoulder edge crisp; no halo or cut-out look along the edges.
Do not change the person's face, expression, skin tone or clothing. Do not add text, signs, people or new light to the photo.Because Gemini redraws the photo from scratch, the person's face can change a little too. In our November 17 measurement, an edit that changed the scene and left the person alone (adding snowfall to the photo) gave a median face similarity of 0.94: very close, though not identical.
2) Blur the whole photo slightly (short version)
Blur this whole photo slightly; keep the colors and composition the same, so the shapes of objects stay recognizable but their details do not. Do not add anything new.For a presentation background, a phone wallpaper or an Instagram image you will put text on. If you don't need anything detailed, one sentence is enough.
3) Blur the crowd in the background
Keep [the person in the foreground, e.g. the woman in the straw hat] sharp in this photo.
Heavily blur every person walking or sitting in the background: their facial features, hairstyles and the text on their clothes should not be recognizable at all, only colored silhouettes should remain.
The structure in the back [e.g. the historic building] should stay recognizable by its shape, with its details blurred.
Do not remove anyone, do not add new people, do not change where the crowd is or how many people are in it.Use it to make strangers in the background unrecognizable when you share a vacation photo. If you want to remove the people, the prompts in our post on removing people from photos are a better fit.
4) Background blur in a product photo
In this product photo, keep [the product, e.g. olive oil in a glass bottle] fully sharp and in focus; do not change or rewrite the text on its label.
Blur the [kitchen counter, window] in the background as if shot with a 100 mm macro lens at f/2.8; keep the colors and the direction of the light the same.
Keep the product's shadow in place on the counter. Do not add new objects, text or logos to the background.For e-commerce and Instagram. If you write the label text in quotation marks, the model is less likely to change letters when it redraws the text.
5) Turn night lights into round glows (bokeh)
Keep [the person] sharp in this night photo.
Turn the streetlights, car headlights and shop window lights in the background into large, soft, round rings of light (85 mm f/1.4 lens effect).
Keep the rings the same color as the lights in the photo: [yellow, orange, white].
Do not change the light and shadows on the person's face, and do not add a new light source.6) Move the focus to someone in the back
Put the focus of this photo on [the person in the back, e.g. the man with glasses sitting at the end of the table]; keep that person fully sharp.
Softly blur [e.g. the drinking glasses and the plates on the table] in the foreground and the people at the edges, as if the lens were focused on the person in the back.
Do not change anyone's face, clothing or position; do not add anything new to the photo.On iPhone, changing the focus works only on photos taken in Portrait mode, and only on iPhone 13 and later; for a normal photo, this prompt does the same job.
7) Motion blur: a sense of speed
Give this photo a sense of speed: keep [the moving subject, e.g. the child riding a bike] sharp.
Blur the background into horizontal streaks, as if the camera were following them from left to right (1/30 second exposure effect).
Give the wheels and feet a slight motion trail, and keep the face sharp.
Make the motion go [from left to right]. Do not add new objects, text or people.8) Blur the edges of a photo
Keep the center of this photo sharp, and let the blur increase gradually toward the edges.
Make the sharp area an oval around [the face in the middle of the photo / the plate in the middle]; the outer [fifth] of the edges should be the blurriest part.
Do not darken the edges, do not change the colors, do not add a frame.People who search for how to blur the edges of a photo usually want to make a face or a dish stand out. If you want the edges darker, change the last line to "darken the edges slightly".
9) Miniature effect (tilt-shift)
Make this photo of [a city, a harbor, a market square] taken from above look like a miniature model: keep a horizontal strip across the middle sharp, and blur more and more above and below that strip.
Run the sharp strip across [the road and the cars in the middle].
Make the colors slightly more saturated. Do not change the number, position or shape of the buildings and cars; do not add new text.10) Blur that makes room for text
Blur the [top third] of this photo; I will put a white headline over it, so leave no detail in that area.
Keep the [person / product] at the bottom sharp, with a soft transition between the two areas.
Darken the blurred area a little so the white text is readable. Do not add any text to the photo; I will add the headline myself.The last sentence matters: the model sometimes writes its own headline in the empty area.
11) Hide a face: cover it with a solid color
In this photo, fully cover the face of [the person to hide, e.g. the child on the right] from forehead to chin with a flat, opaque, [light gray] oval. No facial outline, eyes, mouth or shadow should show inside the oval.
Do not change that person's hair, clothing or pose. Do not touch the other people's faces or the rest of the photo; do not add anything new.In our measurement, blur hid a face only when it was very heavy, while a solid color leaves nothing of the face. Zoom in on the result and check that the oval covers the whole face. The most reliable option is still drawing the box yourself in your phone's markup tool.
12) Fixes in the same chat
In the last image, fix only these:
1. The edge of the [hair strands / shoulder] got blurred too; keep the person's edges crisp.
2. The blur is [too weak]: the [windows of the buildings] in the back are still recognizable, blur them more.
3. The person's face looks different from the photo I first uploaded; take the face exactly from the first photo.
Keep the clothing, colors and framing as they are in the last image.Send prompt 12 in the same chat and give an example of how blurry you want it ("the windows should not be recognizable at all"). If the face has changed, list what shows on your face one by one: moles and where they are, glasses, beard. If three tries don't fix it, switch to your phone's own portrait tool; that tool never touches the face.
How Much Does Blurring a Face Hide? A 14-Photo Measurement
When you blur for privacy, the real question is whether someone could still recognize the face. We asked face recognition software. For our November 6 face shape test, we had four fictional people generated with Gemini (not real people), each with one straight-on portrait and 2 to 4 other photos: smiling, selfie, with bangs, wearing a headscarf, bearded. Across 14 photos in total, we blurred only the face area in steps, pixelated it and drew a black bar over the eyes. Then we had OpenCV's SFace model compare each blurred face with the four people's straight-on portraits and asked "who is this?". Random guessing gets 3.5 right out of 14 on average.
| Method | Setting | Correctly identified (14 photos) |
|---|---|---|
| No blur | - | 14 |
| Gaussian blur | 2% of the face width | 14 |
| Gaussian blur | 4% (light) | 14 |
| Gaussian blur | 6% | 12 |
| Gaussian blur | 8% (medium) | 13 |
| Gaussian blur | 12% (heavy) | 6 |
| Pixelation | 32 blocks across the face | 14 |
| Pixelation | 24 blocks | 14 |
| Pixelation | 16 blocks | 13 |
| Pixelation | 12 blocks | 5 |
| Pixelation | 8 blocks | 5 |
| Black bar over the eyes | face-wide, at eye level | 14 |
The black bar over the eyes hid nothing: the person was identified correctly in 14 of 14 photos. Light blur gave the same result. The bar covers only the eyes, and the rest of the face was enough for a match. The count dropped to 6 only with blur equal to 12% of the face width, and to 5 with 12 or fewer large blocks across the face. That is a little above chance (3.5).
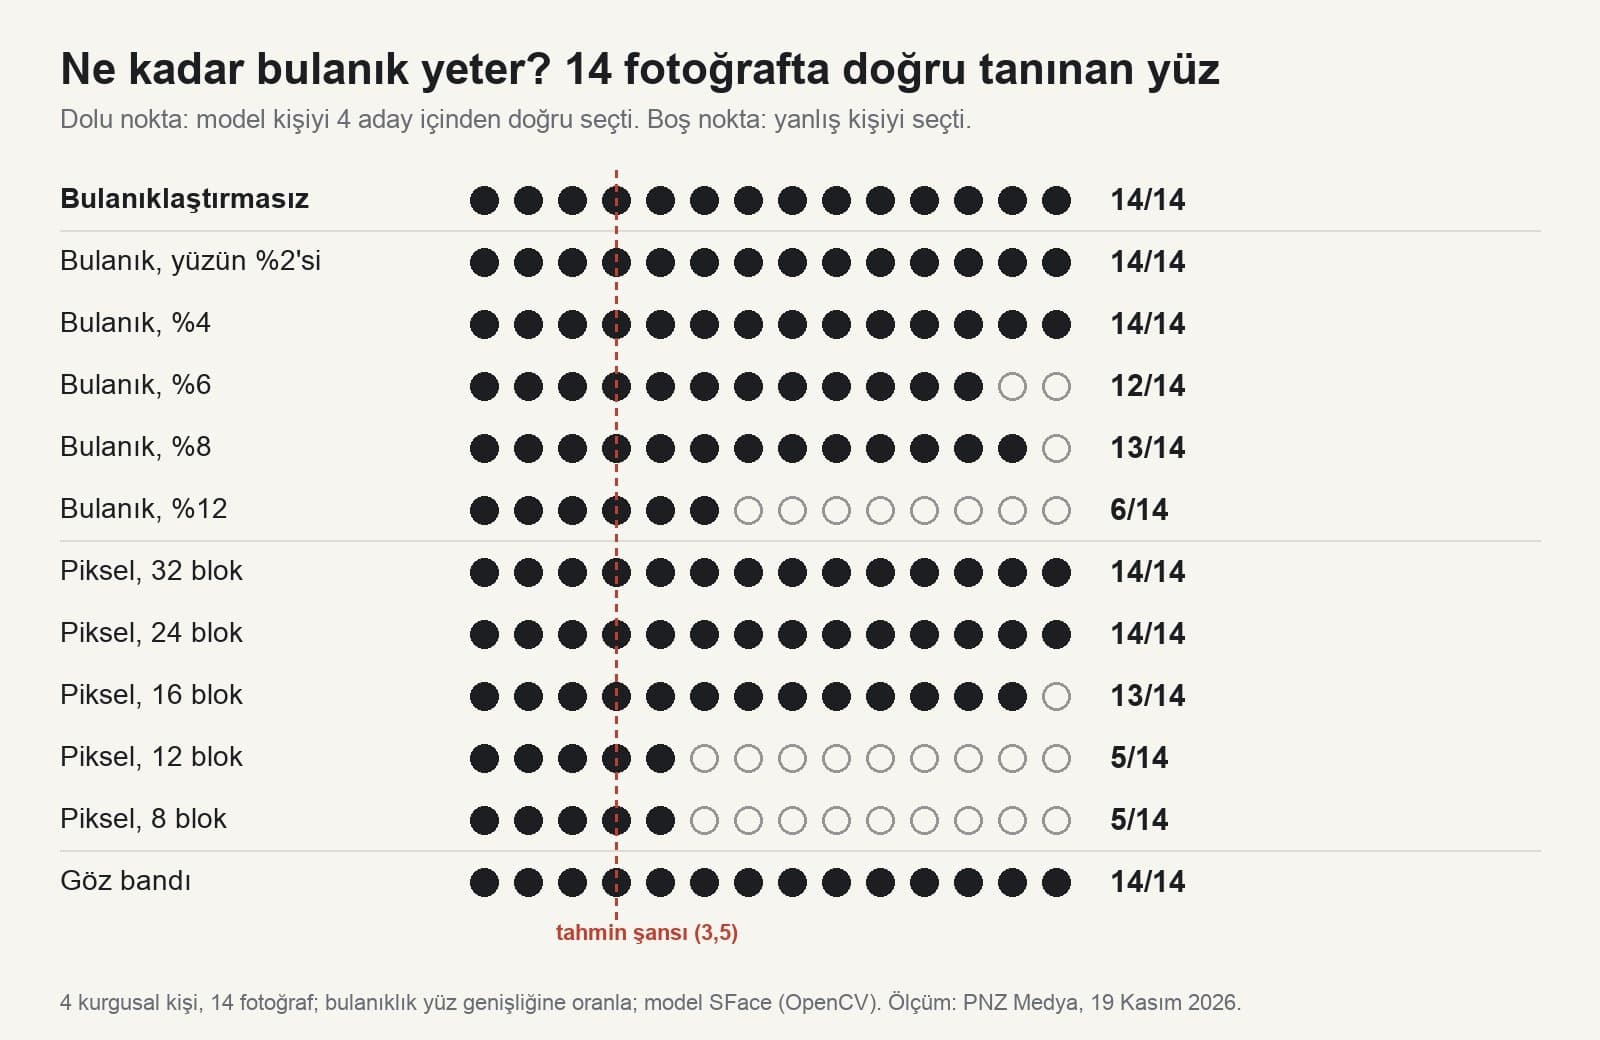
The limits of the measurement are plain: one recognition model, four fictional faces, a candidate list of four people. To align each blurred face, we used the eye and nose points from before the blur, which assumes someone who can mark those points. Hair, clothing and location give a person away as much as the face does, and we left them untouched. The practical rule: if you want to hide a face in a photo you are going to share, cover the whole face with a solid color or reduce it to eight to ten large blocks from top to bottom. "A little blur" hides nothing.
If you brush over a person's face, the face may become blurred with a pixelated effect.
Apple's note also applies to the Clean Up tool on iPhone: when you brush the tool over a face, Photos covers the face with a pixelated effect instead of erasing it. Clean Up runs on Apple Intelligence and requires iOS 18.1. On Android, the Edit > Markup > Redact tool in Google Photos blurs or removes the area you select; according to Google's help page, people you share a redacted photo with cannot bring back the hidden part. Our measurement does not cover how strongly Redact blurs; zoom in on the result, and if the outline of the face is still visible, apply another layer.
Common Mistakes
- Typing only "blur" into Gemini. The model applies a light blur; in our license plate test, the text was readable in 5 of 6 frames.
- Saying "make the text blurry". In our street test, that request (in Turkish) made up a new sign in 4 of 4 frames; say "no signs and no text" instead.
- Trusting an eye bar. In the measurement, all 14 faces with an eye bar were matched to the right person.
- Not naming the person who should stay sharp. With "the one in the foreground", the model sometimes leaves someone in the back sharp too.
- Approving the result on a small screen. A halo around the hair or a small change in the face only shows when you zoom in.
- Uploading the original of a photo you blurred for privacy to the same place. If the original file sits in the cloud or in the chat, hiding the face loses its point.
Before You Share in Turkey: KVKK and Photos of Children
Under Turkey's data protection law (KVKK), a photo of a face is personal data. A photo you upload to Gemini or ChatGPT goes to that company's servers to be processed; get permission before you upload someone else's face. If a school trip, birthday or daycare photo includes other families' children, it is better to hide their faces with your phone's own tool: the photo never leaves the device.
The same rule applies to license plates, ID cards and phone numbers in screenshots. Cover them with a solid color instead of blurring them; our post on removing text from photos has every frame from the license plate test.
For a photo taken in Portrait mode on iPhone, use the slider in Photos > Edit > Portrait > Depth Control. For a normal photo, try Samsung Gallery's Blur background suggestion, the Portrait blur tool in Google Photos, or upload the photo to Gemini and use prompt 1 from this post. To make the whole photo slightly blurry, prompt 2 is enough.
In Photos, open a photo taken in Portrait mode, tap Edit and then Portrait, and adjust the blur with the Depth Control slider. According to Apple, on supported models you can also turn photos of people, cats and dogs taken in Photo mode into portraits with the Portrait icon; changing the focus point is available on iPhone 13 and later.
Yes. In Gemini, you can upload and edit photos with a Google account that has no paid plan; you need to be 18 or older. The phones' own tools (iPhone Portrait, the Samsung Gallery suggestion, Windows Photos) are free as well, but they depend on your device and model.
Light blur does not hide it. In our measurement, a face recognition model matched 14 of 14 lightly blurred faces to the right person, and 14 of 14 faces with a black bar over the eyes. With blur equal to 12% of the face, or 12 large blocks across the face, correct matches fell to 5-6. To hide a face for certain, cover it with a solid color.
Name the person who should stay sharp, describe the blur with a lens ("as if shot with an 85 mm f/1.8 lens"), and say that the face and clothing must not change and that no new text or people should be added. Writing only "blur" usually gives a weak result.
Not in Gemini. In an earlier test, our original Turkish prompt asking to blur the plate "until it can't be read" left it readable in 5 of 6 frames. Cover the plate with a solid-color, opaque box in your phone's editing tool.
For a first try, start with prompt 1 and put the result next to what your phone's Portrait mode gives you; use whichever method leaves the face and hair edges cleaner. If you are blurring to hide something, choose prompt 11 or your phone's markup tool, then zoom in on the photo and check whether anything of the face is still recognizable.
Product and Corporate Photography
We photograph your products, portraits and spaces, and turn them into ready-to-use shots with the background and lighting set for e-commerce and social media. Let's look at what you need in a free initial call.